As summer is approaching and the warm weather settles in, it provides more time to elevate your DIY skills. Becoming a better DIYer is not difficult with the right tools. Take your home from builder-grade to custom-made with these DIY Project Ideas.
Remove Pop-Corn Ceilings
Ditch the archaic pop-corn ceiling for a more modern, sleek look. Removing your popcorn ceiling is a relatively simple DIY project requiring only basic Zenith tools and time.
First, make sure you have the right tools and materials such as the Zenith Floor Lifter, painter’s tape, protective eyewear, dust mask, plastic sheet, ladder, painter extension pole, and sander. Turn off any light fixtures and cover furniture and flooring with a protective cloth to prevent damage. Make sure to keep open the ventilation in the room and ensure you are wearing protective clothing.
The Zenith Floor Lifter is key to completing this project successfully. While the Zenith Floor Lifter, a popular demolition hand tool, offers alternative specialties, such as the ability to remove textured material from ceilings. In addition to a painter’s extension pole, the project can be completed without using a ladder & away from falling debris.
Use a solution of warm water and dish soap to mist the drywall for easier extraction. Once evenly coated, you may now begin scraping the pop-corn ceilings until completely removed. Use a sanding device to smooth out any rough edges. Touch up the ceiling with some new drywall, paint, and enjoy your pop-corn free space!
Zenith Floor Lifter is available on Amazon and the Home Depot.
Remove Door Trim
Over time, door trim, especially the wooden ones, can rot and become damaged. Replacing door casing is an easy DIY project that will elevate your skills. You will need the Zenith Trim Puller, hammer, and utility knife for this project.
To begin, use a utility knife to cut through the caulking by working the blade through the outside edge of the trim. Cut all the way through the caulking to avoid damage to the paint when prying off the trim.
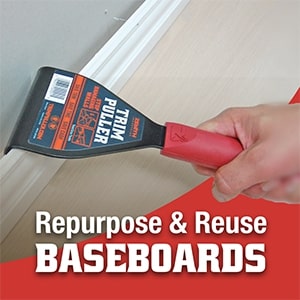
Next, use the Zenith Trim Puller to remove the trim. Slide the Trim Puller’s wedge beneath the trim. You may use the hammer against the trim puller handle to assist in wedging it further. Once the trim is separated from the wall, repeat the process from one end of the trim to the other. Shift the Trim Puller gently down the length of trim to prevent damage to the trim or wall. Once removed, scrape off any remaining caulking with the utility knife. Now, you’re ready to replace the trim or redecorate it as you desire!
The Zenith Trim Puller is a must-have tool if you’re looking to become a DIY Pro. The Zenith Trim Puller is designed to safely remove baseboards, molding, door casings, decorative panels and even nailed or glued countertops. The patented tool does all the work of a pry bar providing ultimate removal efficiency and protection from trim and wall caused by ordinary pry bars.
The Trim Puller is available on Amazon, the Home Depot, and Lowes.
Now that you’re one step close to becoming a DIY Pro, it is important to remember that with the right home remodeling tools and attitude, you can advance your DIY skills in no time, but no matter where your DIY journey takes you, there’s always something more to learn!


